Friday, 21 March 2014

Nesting a Hyper-VM on VMware Workstation 8


Nesting a Hyper-VM on VMware Workstation 8
So, following are the steps to create a Microsoft Hyper-V VM running in VMware Workstation 8, but later I’ll show you how to do it in ESXi 5 as well:
1. Create a New VM with version 8 hardware
2. Give it 4 GB RAM and 2 x vCPUs with about 80-100 GB disk space, depending upon how many VMs you wanted nested underneath Hyper-V.
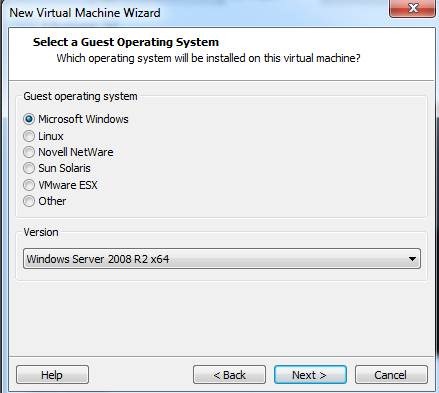
3. The instructions lead you to believe that you should pick a VMware ESX option as the guest OS... STOP! DON’T! Select Windows 2008 R2 x64.
4. When you are finished, make sure you add another NIC to the VM used as the Hyper-V virtual network,
5. Under the settings of the VM > CPU, make sure you have the option to pass-through the Intel VT-x/EPT feature.
6. Make sure you have set the VM to boot from Windows 2008 R2 x64 media ISO.
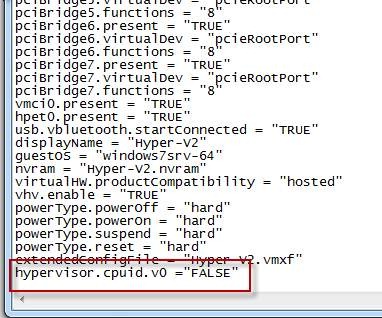
7. Before booting, you should edit the config file .vmx and add the parameter: hypervisor.cpuid.v0 = “FALSE”
8. Now Boot and Install Windows 2008 R2 x64.
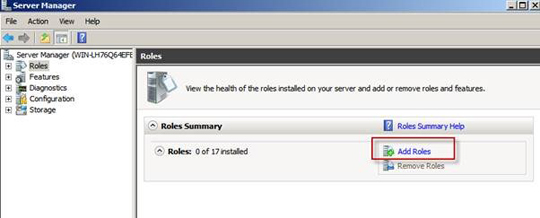
9. Once finished, open up Server Manager and click “Add Role”.
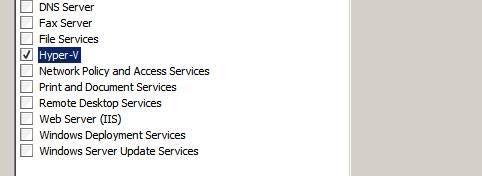
10. Select and install the Hyper-V option. At this point, you will know if your system is working correctly and passing the Intel EPT feature, because if it doesn’t, you won’t be able to go past this point.
11. You’ll also have to select the network adapter used for the virtual network.
12. Now install Hyper-V, which will need a reboot.
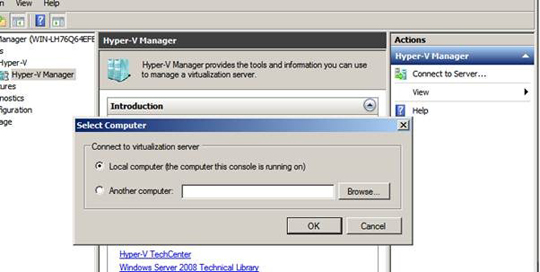
13. After it is completed, open Server Manager drill down to Hyper-V and connect to the local server.
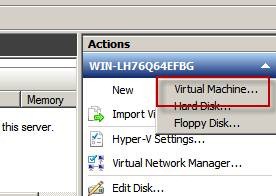
14. Now create and install a virtual machine.
Once done, you should be able to use it as normal, albeit slow.
Nesting Hyper-VM running ESXi 5
Now, doing the same thing on ESXi 5 is a little trickier although some of the steps are the same.
1. Before anything you need to place an entry in the /etc/vmware/config file found in the tech support mode on your ESXi 5. I enabled SSH through the security profile in the vSphere Client. Then used putty SSH into the ESXi system.
2. From there I executed the following command which is needed to allow nested hypervisors :
# echo 'vhv.allow = "TRUE" ' >> /etc/vmware/config
Notice the use of single and double quotes in the command-line
3. Now create a virtual machine using version 8 hardware, 4GB (or as much as you can spare), 2 x vCPUs, 2 or more vNICs and a 100GB virtual disk.
4. Before booting up the VM and installing Hyper-V we need to add two lines the virtual machines config file .vmx
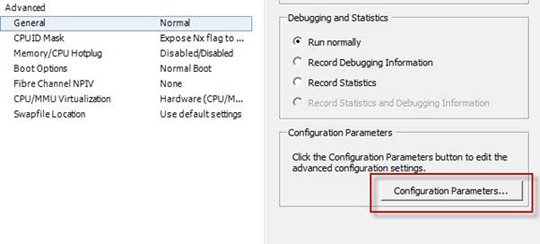
You can try this through the vSphere Client in the settings of the virtual machine > Configuration Parameters, whereas I had better luck doing it from command-line
To add them using command-line move back in SSH > change into the directory where you Hyper-V VM is installed
# echo 'vhv.allow = "TRUE" ' >> /etc/vmware/config
In my example the config file is called Hyper-V.vmx. Type the following commands:
# echo 'monitor.virtual_exec = "hardware" ' >> Hyper-V.vmx
# echo 'hypervisor.cpuid.v0 = "FALSE" ' >> Hyper-V.vmx
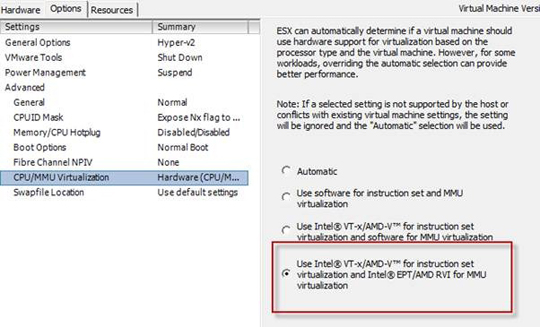
5. Now back in the VM settings > Options > CPU/MMU Virtualization make sure you have the option to pass the Intel EPT feature.
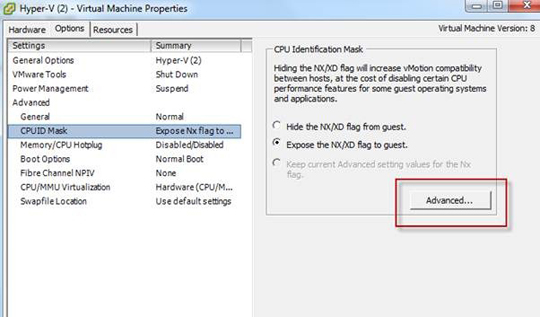
6. Now in the Options area > CPUID Mask click on Advanced
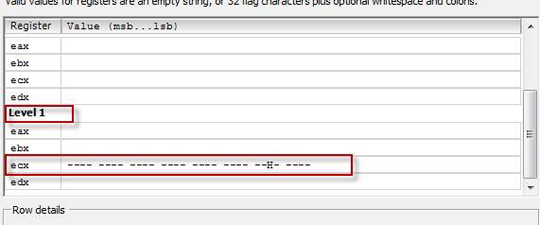
7. Add the following CPU mask Level ECX: ---- ---- ---- ---- ---- ---- --H- ----
8. Now Install Hyper-V or Windows 2008 R2 and enable the Hyper-V role.
9. You are ready to roll.

Friday, 14 March 2014

AD Lightweight Directory Service (AD LDS)


AD Lightweight Directory Service (AD LDS)
Topics Covered
Introduction to AD LDS
Understanding AD LDS Instance
Installation of AD LDS
Creating AD LDS instance

Active Directory Lightweight Directory Service (AD LDS)
AD LDS server role is a lightweight directory access protocol (LDAP) directory service. It
provided data storage and retrieval for directory-enabled application, without the dependencies
that are required for AD DS. In Windows 2003 R2 AD LDS was called as Active Directory
Application Mode (ADAM). AD LDS provides same functionality like AD DS, but it does not
require the use of domain and domain controller. AD LDS is generally used for application
support like Exchange Server 2010, SharePoint Server, etc.
AD LDS is an independent mode of Active Directory that support dedicated directory services
for application without use of AD DS. AD LDS provides independent storage and access for
application. AD LDS uses the same standard API’s or programming standards as active directory
uses. Many applications can use AD LDS like
• Customer Relationship Management(CRM)
• Human Resources application
• Global Address book application, etc.
The greatest advance of AD LDS is that it does not required AD DS and we can run multiple
instance of AD LDS concurrently on a single server, with an independent schema and
configuration set. Each instance of AD LDS uses different port number for communication with
application or client.
Installation of AD LDS
1) Start Server manager and then go to roles
2) Under roles select add roles
3) Under the “Add Role wizard” select Active Directory Lightweight Directory Server” and
click next to continue and complete the installation of AD LDS.
Understanding AD LDS Instance
An AD LDS instance works like a separate a AD LDS server with separate schema and
configuration partition and also a separate port number. Instead of maintaining different server
for different AD LDS instance, we can create multiple AD LDS instance on a single server.
An AD LDS component includes
• Directory Service (dsmain.exe)
• Directory Store data (adamntds.dit)
• LDAP protocols and interface

Every instance we create for AD LDS is stored under c:\program files\<instance name> folder.
We can also change or move the location of AD LDS files.
Creating AD LDS Instance
1. Create n AD LDS Instance
2. Active Directory Lightweight Directory Service Setup Wizard
This wizard helps you install Microsoft Active Directory Lightweight Directory Service
(AD LDS).
AD LDS is a powerful directory service that is easy to install and deploy. It provides a
dedicated data store for applications, and can be configured and managed independent.
To continue, click Next.

3. Create a Unique or Replica Instance of an AD LDS (In my case I am creating a Unique
Instance)
4. Name the AD LDS Instance
The AD LDS service name is created when the instance name is combined with the
product name. It will be displayed in the list of Windows Services.
Side Note: it allows you to use the - and _ symbols in naming, but I have had problems
with these types of names where it would crash the AD LDS and the error logs and
services window would turnicate the name at the first symbol type.

5. Select Port Numbers
The ports displayed below are the first available for this computer. To change these
ports, type the new port numbers in the text boxes below. If you plan to install Active
Directory Domain Services on this computer, do not use 389 for the LDAP port or 636
for the SSL port because Active Directory Domain Services uses these port numbers.
Instead, use available port numbers from the following range: 1025-65535.
6. AD LDS create an application directory partition
Select this option if the application that you plan to install does not create an application
directory partition upon installation. A valid partition name is any distinguished name
that does not already exist in this instance. CN - Common Name, DN -
distinguishedName, SN - Sir Name, OU - Organizational unit.

7. File Location for associated AD LDS files.
8. Service account selection the Network Service Account is sufficient for my need.

9. AD LDS Administrator - In my case the default admin account works.
10. Import Interchange Format LDIF files into the AD LDS application directory partition.

11. Ready to install click Next.
12. Installing AD LDS

13. Finished

AD Rights Management Service


AD Rights Management Service
Topics Covered
Introduction to AD RMS
How AD RMS Works
RMS Lab setup
RMS Installation
Testing RMS using Windows Vista Client

Active Directory Rights Management Service
Active Directory Rights Management Service (AD RMS) was formerly known as rights
management service or information rights management. AD RMS is now integrated with AD and
is now part of windows 2008 server roles. AD RMS is a technology which helps to protect your
information or data. AD RMS enables you to protect your intellectual property through the
integration of your Operating system and Application. AD RMS can reply both AD CS and AD
FS to extend its support.
AD RMS works with a special AD RMS client to protect sensitive information. Protection is
provided through RSN server role, which is designed to provide certificate and licensing
management.AD RMS stores all configuration and logging information in Windows Internal
Database or SQL Server 2005 or SQL Server 2008. With AD RMS you can protect your
company documents from unauthorized access. You can specify which user can access the
document and perform actions like coping, editing, forwarding, printing and deleting.
AD RMS uses client-server architecture using Windows 2008 Server as Server component and
AD RMS client as client component on Windows XP, Vista and 7. AD RMS client is built-in
feature of Windows vista and Windows 7 whereas we need to download RMS client for
Windows XP. The RMS client is required for creating rights-protected documents using the
application supported.
RMS enabled application
• Microsoft Office 2007 Professional
• Microsoft Office Sharepoint Server
• Acrobat Reader (using thirty party software from gigaturst)
• Exchange 2003 and 2007
• Internet Explorer

How AD RMS Works
User TOM wants to protect a Word 2007 document and he wants only HARRY can read the
document and no other user can read it. Moreover, he also wants that HARRY can only read the
document; he cannot print and copy the document. So in order to perform this task he request a
“Client Licensor” certificate from RMS Server. After receiving the certificate from RMS server
the TOM sets the rights and permission on the Word 2007 document. Word 2007 creates a
“publishing licence” and encrypt the document.
TOM now sends the file to HARRY. HARRY after receiving the file open’s the file. Word 2007
calls the RMS server which validates the user and issue a “Use licence”. Word 2007 next opens
the document with appropriate rights given to HARRY. This is how AD RMS works.
Requirement for AD RMS
1) Windows 2008 Server (Domain Member)
2) SQL Server or Windows Internal Database
3) IIS 7.0
4) Active Directory Domain Controller (located for Separate Machine)
5) Certificate Server or Self assigned Certificate

RMS Lab Setup (Our lab requires 3 machines as under)
Operating Systems Application/Role Computer Name
Windows 2008 Server Domain Controller Dc1.vision.com
Windows 2008 Server Member Server
AD RMS Role
IIS Role
Internal Database
Rms1.vision.com
Windows Vista Office 2007 Client1.vision.com
Other Requirements
1) Create 2 users on Domain Controller (i.e. rms_service and rms_installer). These users are
required for RMS to works. The first user rms_service is required to start the RMS server and
rms_installer is used for installation of RMS service.
2) Rms_installer user must be member of Enterprise admin and local administrator group of
RMS1.VISION.COM.
3) Set the password settings for both the users as “password never expires” and “user cannot
change the password”
4) Next create 2 more user on Domain Controller (i.e TOM, DICK and HARRY). These uses will use
client machine for login and testing of RMS.
5) Set the email address for both the users. (Email address is compulsory for RMS to work).

Installation of RMS Role on RMS1.VISION.COM
1) Login with rms_installer on RMS1.VISION.COM (note : before login add rms_installer to local
administrator group)
2) Start – Server Manager
3) Click Roles and select add roles
4) Select “Active Directory Rights Management Service” and click next.

5) When you select AD RMS role, windows will prompt to install IIS as shown below
6) Next select the additional role required if required
7) Next select “ create new cluster”

8) Select the Database required to store AD RMS data. In our case we will select “Windows Internal
Database”. But in production environment use SQL server
9) Next specify the service account. In our case it is rms_service user.
10) Next select “use AD RMS centrally managed key storage”

11) Specify AD RMS cluster password.
12) Next specify a FQDN name for the RMS server and then click on validate. Before specifying the
FQDN name we have to create a host entry in DNS for the same.

13) Next select the certificate for SSL encryption. In our case we will use “Create self-assign
certificate” but in production environment use of existing certificate and import it from CA.
14) Next select the AD RMS service point registration option to register AD RMS in Active directory.

15) Next, click next to complete the installation of RMS service
Testing AD RMS using Windows Vista Client
To verify the functionality of the AD RMS deployment, you will log on as Nicole Holliday and
then restrict permissions on a Microsoft Word 2007 document so that members of the CP&L
Engineering group are able to read the document but unable to change, print, or copy. You will
then log on as Stuart Railson, verifying that the proper permission to read the document has been
granted, and nothing else. Then, you will log on as Limor Henig. Since Limor is not a member of
the Engineering group, he should not be able to consume the rights-protected file.
To restrict permissions on a Microsoft Word document
1. Log on to Client1.vision.com as user TOM
2. Click Start, point to All Programs, point to Microsoft Office, and then click Microsoft Office
Word 2007.
3. Type some data in the blank word file.
4. Click the Microsoft Office Button, click Prepare, click Restrict Permission, and then click
Restricted Access.

5. Click the Restrict permission to this document check box.
6.
7. In the Read box, type harry@123.com, and then click OK to close the Permission dialog box.
8. Click the Microsoft Office Button, click Save As, and then save the file
9. Log off as TOM.

Next, log on as HARRY and open the document
1. Log on to client1.vision.com as user HARRY
2. Click Start, point to All Programs, point to Microsoft Office, and then click Microsoft Office
Word 2007.
3. Click the Microsoft Office Button, and then click Open.
4. select the file to open.
5. The following message appears: "Permission to this document is currently restricted. Microsoft
Office must connect to https://rms.vision.com:443/_wmcs/licensing to verify your credentials
and download your permission."
6. Click OK.
7. The following message appears: "Verifying your credentials for opening content with restricted
permissions…".
8. When the document opens, click the Microsoft Office Button. Notice that the Print option is not
available.
9. Close Microsoft Word.
10. Log off HARRY

Active Directory Certificate Service (ADCS)


Active Directory Certificate Service (ADCS)
Topics Covered
Introduction to Certificate Service
Introduction to PKI
Installation of AD CS
Creating Certificate Templates
Installation web server certificate for SSL

Introduction to Certificate service
Windows Server 2008 Certificate Services provides customizable services for creating and
managing public key certificates used in software security systems employing public key
technologies. Organizations use certificates to enhance security by binding the identity of a
person, device, or service to a corresponding private key. However, in order to realize the
enhanced security made possible by certificates, organizations need a cost effective, efficient,
secure way to manage the distribution and use of certificates. Certificate Services is the
Windows Server 2008 service that provides the core functionality for Windows Server 2008
CAs. Certificate Services provides customizable services for managing certificates for a
particular CA and for the enterprise.
Certificate Service in Windows 2008 is based on Active Directory. In Windows 2008 it is called
as Active Directory Certificate Service (AD CS). Prior to Windows 2008 i.e. in Windows 2003
server it was just called as Certificate Service.
AD CS includes various new features like
• Web Enrollment
• Auto Enrollment
• Online Responder Service
• New templates
• Network Device Enrollment, etc.
What is use of Certificate Service (CS)
Certificate Service is used to
• Encrypt data files
• Encrypt remote communication
• Secure emails
• Secure logons using smart card
• protect data from tempering, etc.
What is Certificate
A certificate is a file that contains
• A public key for encryption
• A digital signature for identity verification
• A name, which can refer to a person, a computer or organisation
• A validity period

• The location of a revocation center
• A certificate issued by a server called as Certificate Authority (CA)
What is Certificate Authority (CA)
A CA is a trusted party which is responsible for issuing and validating the identity of a
certificate. A certificate is generated by CA using a private key, which is a part of while Public
Key Infrastructure(PKI).
Common Certificate Services Scenarios
Managing certificates and CAs involves the following processes:
Issuing certificates to users and computers : The issuance process includes obtaining and
validating information about the intended recipient of the certificate, placing policy restrictions
designated by the organization in certificates that are issued, and publishing the certificates to a
directory.
Managing certificate lifetimes : Because all certificates have a limited life, certificates need to
be renewed or allowed to expire. The renewal process is similar to the issuance process, but
typically involves fewer security checks. Thus, when an organization develops its renewal
strategy, it should balance security concerns against potential disruptions to users.
Revoking certificates and verifying revocation status : Some certificates need to be
invalidated before their expiration date. Effective certificate revocation and revocation
verification processes are critical to the security of an organization’s public key infrastructure
(PKI).
Certificate Service and its application compatibility
Certificate service can be used in wide variety of application like :
• Wireless Networking : Certificate are used by wireless client and access point to
determine unauthorized users
• VPN : Certificates are used for client authentication in VPN network and also for secure
communication
• Digital Signing : certificates are used to verify the identity of users in application likes
email, etc.
• Data security : Certificates are useful for data security like Encryption of data, Drivers
signing, etc.

• Authentication : certificates are use for authentication of users.
Introduction to PKI
Public Key Infrastructure(PKI) is an architecture or technology which allows for secure
communication using two keys (i.e. Public key and Private Key). The keys are distributed with
the help of Digital certificates. These certificates store public key and private keys. Digital
certificates are issued by a server called as Certificate Authority (CA). PKI is the most secure
method of communication, authentication, etc.
To understand PKI we need to first understand 3 terms
1) Cryptography : It is the science of making or altering data greater than the potential value
gained
2) Cryptosystems : It is a system that provides techniques for mangling a message into a
apparently intelligible form and then recovering it from the mangled form
3) CipherText : The data encrypted by cryptography is called as ciphertext.
All cryptosystems are based on 3 cryptographic algorithms
1) Message Digest (MD-2, MD2-4-5, SHA, SHA-1, …)
• Maps variable length plaintext into fixed length ciphertext
• No key usage, computationally infeasible to recover the plaintext
2) Secret Key (Blowfish, DES, IDEA, RC2-4-5, Triple-DES, …)
• Encrypt and decrypt messages by using the same Secret Key
3) Public Key (DSA, RSA, …)
• Encrypt and decrypt messages by using two different Keys: Public Key, Private
Key (coupled together)

Let us see how Public key Infrastructure Works
The magic of PKI occurs through the use of extremely long prime numbers, called keys. Two
keys are - a private key, which only you have access to, and a public key, which can be
accessed by anyone. The two keys work together, so a message encrypted with the private key
can only be decrypted with the public key and vice versa. The more digits in these keys, the more
secure the process.
Let's look at how all this works together in a simple transaction. Bob wants to send Alice a
confidential e-mail. Bob would use Alice's public key, stored in her certificate, to encrypt the
message. When Alice receives the message, she uses her private key to decrypt it. Because no
one else possess Alice's private key, only she can decrypt the message.
The process is similar in complex transactions. Let's say Bob wants to let Alice order products
from his Web site. When Alice is ready to buy, Bob requests that she prove her identity. Alice
signs the order with her private key, which was issued by a certificate authority we'll call
TrustCo. She then sends the package consisting of the order and the digital signature to Bob.
Bob needs to get Alice's and TrustCo's digital certificate to verify the signature. He validates
Alice's certificate by verifying TrustCo's signature (remember TrustCo signs Alice's public key,
thus forming the certificate), and then uses Alice's certificate to validate the signature on the
order. If all those tests pass, Alice is actually Alice.
Types of certification authorities
A certification authority (CA) accepts a certificate request, verifies the requester's information
according to the policy of the CA, and then uses its private key to apply its digital signature to
the certificate. The CA then issues the certificate to the subject of the certificate for use as a
security credential within a public key infrastructure (PKI). A CA is also responsible for
revoking certificates and publishing a certificate revocation list (CRL).

A CA can be an outside entity, such as VeriSign, or it can be a CA that you create for use by
your organization by installing AD CS. Each CA can have distinct proof-of-identity
requirements for certificate requesters, such as a Windows Server 2008 family domain account,
employee badge, driver's license, notarized request, or physical address. Identification checks
such as this often warrant an onsite CA, so that organizations can validate their own employees
or members.
Microsoft enterprise CAs use a person's user account credentials as proof of identity. In other
words, if you are logged on to a Windows Server 2008 family domain and request a certificate
from an enterprise CA, the CA knows that you are who the Active Directory service says you
are.
AD CS support two types of CA
Standalone CA : A CA that is not necessarily integrated with AD DS. A standalone CA are CA
running on member server or standalone server in a network. Standalone CA are often used as
internal root CA and are taken offline for security purpose after they have been used to generate
certificate for subordinate server.
Enterprise CA : This CA is integrated with AD CS. Enterprise CA are usually member server
and are use to issues certificate to subordinate CA.

Installation of Active Directory Certificate Service
To set up an enterprise root CA
1. Log on to SRV-CA server as a domain administrator.
2. Click Start, point to Administrative Tools, and then click Server Manager.
3. In the Roles Summary section, click Add roles.
4. On the Select Server Roles page, select the Active Directory Certificate Services check
box. Click Next two times.
5. On the Select Role Services page, select the Certification Authority check box, and
then click Next.

6. On the Specify Setup Type page, click Enterprise or Standalone as per your
requirement, and then click Next.
7. On the Specify CA Type page, click Root CA, and then click Next.

8. On the Set Up Private Key and Configure Cryptography for CA pages, you can
configure optional configuration settings, including cryptographic service providers.
However, for basic testing purposes, accept the default values by clicking Next twice.
9. In the Common name for this CA box, type the common name of the CA, RootCA1,
and then click Next.

10. On the Set the Certificate Validity Period page, accept the default validity duration for
the root CA, and then click Next.
11. On the Configure Certificate Database page, accept the default values or specify other
storage locations for the certificate database and the certificate database log, and then
click Next.
12. After verifying the information on the Confirm Installation Options page, click Install.
13. Review the information on the confirmation screen to verify that the installation was
successful.

Certificate Authority Console
Creating Certificate Templates
Windows 2008 certificate service includes a bunch of certificate templates. The templates are
like Web Server templates, user template, computer template, domain controller template, EFS
template, smart card login template, etc. We you use this templates to distribute certificate or we
can create new template based on this existing template. Now in our case we will create a
duplicate template for Web server and use this template to assign certificate to web site.
Steps for create a new duplicate template
1. Open the Certificate Authority snap-in
2. Right-click on Certificate template and select “Certificate Template”
3. Now the Certificate Templates snap-in window appears on screen.
4. In the details pane, right-click an existing certificate (i.e Web Server template) that will
serve as the starting point for the new certificate, and then click Duplicate Template.
5. Choose whether to duplicate the template as a Windows Server 2003–based template or a
Windows Server 2008–based template.
6. On the General tab, enter the Template display name and the Template name, and then
click OK.

7. Define any additional attributes for the newly created certificate template.
8. Go to Security tab and apply “Enroll” permission to “authenticated user”.
Certificate Revocation List (CRL)
Certificate Revocation List(CRL) is a list of certificates that have been revoked and therefore
should not be relied upon. There are N number of reasons for a certificate to be revoked like
• Unspecified certificate
• key Compromise
• Tampering of Certificate
• Superseded
• Certificate Hold
• Privileged withdrawn, etc
A CRL is generated and published periodically. A CRL is always issued by the CA which issues
the corresponding certificate. All CRL have a lifetime during which they are valid. This
timeframe is generally 24 hours or less.
If you are using Active Directory Certificate Services, you must configure the CA that issues the
certificates to the server with additional certificate revocation list (CRL) distribution settings.
The CA which stores the CRL is called as CRL Distribution Point (CDP). CDP is an online and
publicly accessible point where Certificate revocation lists are kept. It is an house where the
entire list or only a sub set of the revoked certificates.
Online Responder
An Online Responder (OR) is a trusted server that receives and responds to individual client
request for information about the status of a certificate. OR is a new feature introduced in
Windows 2008 Server. It is an advancement to CRL Distribution Point (CDP) where client has to
manually download the entire list of CRL.
The use of OR is one of two common methods for checking the validity of certificates. OR
receivies and responds only to individual requests from client for information about status of a
certificate. OR can process certificate request more efficiently than CRL
• Client who connects to the network remotely need high-speed connection to download
CRLs
• A network needs to handle large peaks of revocation checking, such as large number of
user sending signed mails.

Components of Online Responder
OR Service : The OR service decodes a revocation status request and sends reply to the client
OR : IT is a CA on which OR service is installed.
OR Web Proxy : The service interface for OR is implemented in IIS. The web proxy received
and decodes the request and cache response for a period of time.
OR Array : IT is a group of multiple OR to provide redundancy and load balancing
OCSP : Online Certificate Status Protocol - A protocol which allows a client to submit a
certificate status request to OR by using HTTP protocol. IT is a communication protocol
between Client and Server.
How Online Responder works
• When a client attempts to verify a certificate, the client first checks its local memory and
cache to find the revocation data.
• If noting is found, a request is send to OR by using HTTP protocol.
• The OR Web proxy decode and verify the request. If the request is valid, it forwards the
request to OR service.
• The OR service takes the requests and checks its local CRL and replies with answer to
the web proxy
• The web proxy then encode the answer and send it back to the client.

Domain Rename feature


Domain Rename feature
Topics Covered
Introduction to domain rename
Steps for domain rename

Procedure of Domain rename
Domain rename was first added as a new feature in Windows 2003 and a separate add-on tool
was available for domain rename. But in Windows 2008 this feature/tool is built-in. The domain
rename operation is supported only with Active Directory forest and only if all domain
controllers in the forest are running Windows Server 2003 server or higher and the forest
functionality has been raised to Windows Server 2003 or higher. Therefore, before you can
rename a domain in your Active Directory forest, you must ensure that the forest functionality
has been raised to at least Windows Server 2003.
Domain Rename Scenario
Scenario – I : A single domain with single forest rename
Scenario – II : rename of a child domain within a tree

Scenario – III : Restructure of a child domain
Step - I
Raise the forest functional level to Windows 2003 Server or higher. Below are the steps to
perform this action.
1. Open Active Directory Domains and Trusts.
2. In the scope pane, right-click Active Directory Domains and Trusts and then click Raise
Forest Functional Level.
3. In the Select an available forest functional level box, click Windows Server 2003, and then
click Raise.
4. Click OK to raise the forest functionality, and then click OK again.
Step – II
In this step, you will generate a description of your current forest structure as an XML-encoded
file containing a list of the entire domain directory partitions as well as application directory
partitions that constitute your forest. This file is used to rename your current domain name.
At command prompt type c:\domren\rendom /list
This command creates a file domainlist.xml which we are going to use to help domain rename.
Step-III

The next step is to open the domainlist.xml file and edit the domain names from old domain
name to new domain name. Below is the example of this file.
File created with random /list
<?xml version = “1.0”?>
<Forest>
<Domain>
<!-- PartitionType:Application -->
<Guid>59add6bb-d0e8-499e-82b9-8aaca5d3e18b</Guid>
<DNSname>DomainDnsZones.vis.com</DNSname>
<NetBiosName></NetBiosName>
<DcName></DcName>
</Domain>
<Domain>
<Guid>89cf8ae3-f4a3-453b-ac5c-cb05a76bfa40</Guid>
<DNSname>vis.com</DNSname>
<NetBiosName>VIS</NetBiosName>
<DcName></DcName>
</Domain>
File after editing the domain name
<?xml version = “1.0”?>
<Forest>
<Domain>
<!-- PartitionType:Application -->
<Guid>59add6bb-d0e8-499e-82b9-8aaca5d3e18b</Guid>
<DNSname>DomainDnsZones.vision.com</DNSname>
<NetBiosName></NetBiosName>
<DcName></DcName>
</Domain>
<Domain>
<Guid>89cf8ae3-f4a3-453b-ac5c-cb05a76bfa40</Guid>
<DNSname>vision.com</DNSname>
<NetBiosName>VISION</NetBiosName>
<DcName></DcName>
</Domain>
Step – IV
After editing or modifying the domainlist.xml file the next step is to review and verify that the
domain name changes you have specified in the forest description file domainlist.xml yield the
desired new forest structure that you wish. The command to perform this action is
rendom /showforest

Step-V
In this step, you will use rendom.exe to generate the domain rename instructions required to
make your new target forest structure effective. Rendom translates the new forest structure and
update instructions that will be executed individually and remotely on each DC in the forest. This
command creates a file called as dclist.xml which contains the list of DC in forest.
Command to perform this action.c:\> rendom /upload
Step-VI
In this step, you will force Active Directory replication to push the domain rename instructions
that were uploaded to the domain naming master to all domain controllers in the forest. In
addition, you will verify that the DC Locator records registered in DNS by each DC for the new
domain names have replicated to all DNS servers that are authoritative for those records.
rendom /prepare
Step – VII
In this step, you will execute the domain rename instructions. To execute the script, the control
station computer issues an RPC to each DC in the forest individually, which causes each DC to
execute the domain rename instructions and then reboot automatically after having executed the
instructions successfully.
rendom /execute
After restarting all DC and domain will be rename to the new name.
Step – VIII
After the restart of all the DC the next step is to repair or fix the Group policy. To do so there is a
tool called as gpfixup.exe
Gpfixup /olddns:<olddomain.com> /newdns:<newdomain.com>

Domain Name Server (DNS)


Domain Name Server (DNS)
Topics Covered
Introduction to Name Resolution
Introduction to DNS
DNS and DHCP Integration
DNS and Active directory Service
Installation of DNS
Creation of Zones
Creation of Resource Record (RR)
Zone Transfer
Delegation of DNS

Introduction
DNS (Domain Name Service)
DNS stands for Domain name Server. The primary and the basic function of DNS is to provide
name resolution service. DNS resolves Fully Qualified Name Domain (FQDN) to IP Address
.i.e www.visioninfosystems.org to 203.145.10.52. DNS is heart of WWW service. DNS is
widely used in Internet to resolve website names to IP address. In Windows 2008 AD DS based
network DNS plays an important Role.
1. DNS is used to resolve names of host in an AD DS based domain.
2. DNS contains and SRV record to all find resources like DC, Global Catalog, PDC, etc.
The DNS service provides name resolution for clients running Windows 2000/XP/2003. With
name resolution, users can access any host by name rather than having to use IP addresses that
are difficult to remember. Name resolution is similar to looking up a name in a telephone book,
where the name is associated with a telephone number. For example, when you connect to the
Vision Infosystems Web site, you use the name www.visioninfosystems.org. DNS resolves
www.visioninfosystems.org to its associated IP address, 203.145.10.52. The mapping of names to
IP addresses is stored in the DNS database or DNS zone.
DNS is used in hierarchical fashion same like the AD DS naming system. In fact, AD DS uses
the same DNS based naming systems. In DNS the top level of hierarchy is root domain. It is
represented by a period (.).

Under this root, there are many top level domains like .com, .org, .edu, .org, .mil, etc. Since this
top level domain names are registered in Internet it is recommended not to used this top level
names for your Pvt. ADS naming system. Microsoft recommends using .local as your top level
domain naming. Under the top level domain, there are other domains called as second level
domains. These domains are also called as sub-domains. These sub-domains are used by
organization, person, company, government, etc. as their domains. e.g. visioninfosystems.org.
Under this sub-domains you can assign names to each host called as resource records like
www.visioninfosystems.org, mail.visioninfosystems.org, forum.visioninfosystems.org, etc
Example:
How DNS name resolution Works
Suppose that a user wants to access the Vision official website i.e. www.visioninfosystems.org.
Now lets see how DNS plays roles to view Vision website :
1. The user types in a URL of www.visioninfosystems.org in Internet Explorer on his
Windows based computer.
2. Internet Explorer sends a query to the DNS client software (on the user’s computer) to
determine the IP address of www.visioninfosystems.org.

3. The DNS client software sends a query to the DNS server on the network or ISP, asking
that DNS server to resolve www.visioninfosystems.org to an IP address.
4. If the DNS server has the entry for the website to sends reply to the client, if it does not
have the entry it sends query to other DNS server under the request is replied.
5. If any of the DNS server name find the appropriate entry for the domain
www.visioninfosystems.org, the DNS server reply the query.
6. When the DNS client software on the user’s computer receives the IP address of
www.visioninfosystems.org, it caches this IP address for future use, and also forwards the
IP address to Internet Explorer.
7. Internet Explorer then establishes TCP network communications with
www.visioninfosystems.org, and opens the Web page for the user.
DNS Queries
DNS can be called as query and answering protocol where one asks question or query and other
reply the query. An DNS client ask a query and DNS server answers the query with a positive or
negative answer. DNS support 3 different types of query
1) Recursive Query
2) Iterative Query
3) Inverse Query
Recursive Query
Recursive query is a type of query where the DNS server must reply with a answer or no. A
recursive query means a DNS server must fully answer the query or give an error. Recursive
query is generated by DNS client or Forwarder DNS.
When a host sends a recursive query example: www.visioninfosystems.org to DNS server, the
server must reply YES or NO to the client. The process of recursive query is as under
1) A host sends a recursive query www.visioninfosystems.org to local DNS server.
2) The local DNS server check is zone database, cache, etc. If found it reply with the
solution.
3) If not found the DNS server then sends a iterative query to other DNS server or Root
Server.
4) The root server replies the DNS server with the IP address of “.org” server.
5) The DNS server goes to the “.org” server and the “.org” server replies the
visioninfosystems.org DNS server.
6) The DNS server then goes to the visioninfosystems.org DNS server and this server
replies the address of host www.visioninfosystes.org to the local DNS server.
7) The DNS server then replies the same to the client.

Iterative Query : An iterative name query is one in which a DNS client allows the DNS server
to return the best answer it can give based on its cache or zone data. If the queried DNS server
does not have an exact match for the queried name, the best possible information it can return is
a referral (that is, a pointer to a DNS server authoritative for a lower level of the domain
namespace). The DNS client can then query the DNS server for which it obtained a referral. It
continues this process until it locates a DNS server that is authoritative for the queried name, or
until an error or time-out condition is met.
DNS Zones
Before creating entry for domains in DNS server we must first understand what is Zone. A zone
is a storage unit for a domain and related records. The zone can be stored in a zone file or in
Active directory. For every domain we required a zone in DNS. A zone contains information
called as Resource Record (RR) for a specific domain. e.g. for visioninfosystems.org domain we
are require to create a zone called as visioninfosystems.org. Remember that the zone name and
domain name should be same. All domain information is that stored in zone example host(A)
record, MX record, SRV record, PTR record, etc. If a DNS server which is hosting zone for
visioninfosystems.org is down then we cannot resolve names. So it is recommended to place this
information on multiple servers for redundancy and also load balancing. So that if one DNS
server is down, the other DNS server is provide redundancy for the first DNS server. Microsoft
has divided DNS zone into 3 categories for provide redundancy and load balancing. They are :
Standard Primary Zone : A standard primary zone stored IP to FQDN mapping in a zone file.
This zone file is a normal TEXT/ASCII file located in default location i.e.
c:\windows\system32\dns\<domain.com.dns> file. Any changes made to the standard primary
zone are replicated to all secondary zone specified. There can be only one primary zone for a
domain. Primary zone is less secure because anyone can tamper the zone file. Replication
between primary and secondary is called full replication.
Standard Secondary Zone : A standard secondary zone contains a copy of primary zone file. A
standard secondary zone is a replica of an existing zone. Secondary zones are read-only and are
also stored in standard text files. Any changes made to primary are replicated to secondary. The
replication process is one-way replication. Primary-secondary zone works in master-slave
relationship.
Active Directory Integrated Primary Zone : This type of Zone is first introduced in Windows
2000. This DNS zone stores zone information in Active Directory. This zone is also like primary
zone. We can place multiple AD integrated zone for a domain. Any changes made to a zone are
replicated to all zones. AD integrated zone support multi-master replication i.e. it support two
way replication which is not possible in primary-secondary zones. AD integrated zones also
supported incremental replication. So if your domain contains active directory it is recommended
to use active directory integrated primary zone.

Stub Zone : A stub zone is like a secondary zone and also read-only like a secondary zone. But
the differences end here, as stub zones are quite different from secondary zones in a couple of
significant ways. First, while secondary zones contain copies of all the resource records in the
corresponding zone on the master name server, while stub zones contain only three kinds of
resource records:
• A copy of the SOA record for the zone.
• Copies of NS records for all name servers authoritative for the zone.
• Copies of A records for all name servers authoritative for the zone.
Stub zone does not contain CNAME records, MX records, SRV records, or A records for other
hosts in the zone. So while a secondary zone can be quite large for a big company's network, a
stub zone is always very small, just a few records. A stub zone is good for a remote location
where you do not want to maintain large no. of records.
DNS Zone Types
There are two zone lookup types: forward lookup zones and reverse lookup zones.
Forward Lookup Zones
A forward lookup zone enables forward lookup queries. On name servers, you must configure at
least one forward lookup zone for the DNS service to work A forward look zone resolves Host
name to IP address
Reverse Lookup Zones
A reverse lookup zone enables reverse lookup queries. Reverse lookup zones are not required. It
resolve IP address to host name. However, a reverse lookup zone is required to run
troubleshooting tools, such as NSLOOKUP, and to record a name instead of an IP address in
Internet Information Services (IIS) log files.
Resource Records
Resource records are entries in the zone database file that associate DNS domain names to
related data for a given network resource, such as an IP address. There are many different types
of resource records. When a zone is created, DNS automatically adds two resource records: the
Start of Authority (SOA) and the Name Server (NS) records
Resource Record
Host (A) : Lists the host name-to-IP-address mappings for a forward
lookup zone.

Alias (CNAME) : Creates an alias, or alternate name, for the specified host
name. You can use a Canonical Name (CNAME) record to
use more than one name to point to a single IP address. For
example, you can host a File Transfer Protocol (FTP)
server, such as ftp.visioninfosystems.org, and a Web server,
such as www.visioninfosystemst.org, on the same computer.
Host Information (HINFO) : Identifies the CPU and operating system used by the host.
Use this record as a low-cost resource-tracking tool. Mail
Exchanger (MX) Identifies which mail exchanger to
contact for a specified domain and in what order to use
each mail host.
Name Server (NS) : Lists the name servers that are assigned to a particular
domain.
Pointer (PTR) : Points to another part of the domain namespace. For
example, in a reverse lookup zone, it lists the IP-address-toname
mapping.
Service (SRV) : Identifies which servers are hosting a particular service. For
example, if a client needs to find a server to validate logon
requests, the client can send a query to the DNS server to
obtain a list of domain controllers and their associated IP
addresses.
Start of Authority (SOA) : Identifies which name server is the authoritative source of
information for data within this domain. The first record in
the zone database file must be the SOA record.
DNS Root Server
A Root DNS is a server which is last point to resolve the query. This DNS server does not
forward query to other DNS server. If you have only one DNS server on your network, and your
network is not connected to the Internet, you can consider configuring it to be a root server. If
you already have a root server on your network, or if your network is connected to the Internet,
you’ll need to configure this DNS server to use either the existing root server on your network or
the root servers on the Internet.
Note : There are total 13 Root DNS server in Internet each located at different location on
Internet. Root Servers are called as Root Hints
To view all the 13 Root Server goto the properties of DNS Server and then go to Root Hints tab
to view all the root server list with names and IP address.

Installation of DNS Server
To install a DNS server, go to Control Panel and double-click Add or Remove Programs Icon.
Then click Add/ Remove Windows Components. The DNS component, like the DHCP, WINS,
component, is a subcomponent of the Networking Services component in the Windows
Components Wizard.
After the installation wizard has completed, you can access the DNS console by selecting Start -
Administrative Tools and then select DNS.
Note : When you install Active directory server on a server you are prompted to install DNS on
the server. It is recommended to install DNS at that time.
Configure Client to use DNS server
1. From the desktop, select Start – Settings -Control Panel or right-click on My Network
places icon on your desktop.

2. In the Control Panel dialog box, double-click the Network and Dial-up Connections
folder.
3. In the Network and Dial-up Connections folder, right-click Local Area Connection and
select Properties from the menu that appears.
4. In the Local Area Connection Properties dialog box, highlight Internet Protocol (TCP/IP)
and click Properties.
5. In the Internet Protocol (TCP/IP) Properties dialog box, ensure that the “Use the
following DNS server addresses” option is selected. Then, in the Preferred DNS server
text box, type the IP address of this DNS server.
6. In the Internet Protocol (TCP/IP) Properties dialog box, click OK.
7. In the Local Area Connection Properties dialog box, click OK.
8. Close the Network and Dial-up Connections folder.
DHCP and DNS integration
If we are using DNS for name resolution then change in IP address of any Client computer
should affect DNS too. So in a network where there are frequent changes of IP address by DHCP
server can create an overhead for DNS server to manually change the information in DNS
database. In order to resolve this issue Windows 2008 DHCP has a feature of dynamic update of
client information in DNS. So when there is a change in IP address information of a client by a
DHCP server, the server sends the update of it to DNS server to update the client information in
DNS database. This feature is called as Dynamic DNS (DDNS).
Dynamic Update for Windows based Clients : Windows based client automatically register
their names in DNS server when there is change of IP address information by DHCP server

Dynamic Update for non - windows based Clients : Non - Windows based client does not
automatically register their names in DNS server when there is change of IP address information
by DHCP server. So to do so DHCP server automatically sends an update to DNS server
regarding the change.
DNS Query type
Recursive Queries : In a recursive query, the DNS name server is requested to respond with the
requested data from client, or with an error stating that data does not exist or that the domain
name specified does not exist. The DNS name server cannot refer or query the request to a
different name server.
Iterative Queries : In an iterative query, the DNS name server gives the best answer it currently
has back to the requester client. This answer may be the resolved name or a referral to another
name server that may be able to answer the client's original request.

Steps for creating Primary DNS zone
1. Go to Start – Programs – Administrative tools – DNS
2. Expand the server name icon and select Forward lookup
3. Right-click on the forward lookup icon and select New Zone
4. Select Primary zone from this window shown.
5. Do not select the checkbox “Store zone information in active directory” and then click
Next button.
Note : The option “Store zone information in active directory” is used to create active
directory integrated zone.
6. The Zone File window opens. The zone filename should match the zone name with a
.DNS extension.
7. Click Next. The Dynamic Update window opens. Select your update option. The Allow
Only Secure Dynamic Updates option will only be available for Active Directory
Integrated zones.
8. Click Next. The wizard displays a completion window.
9. Click Finish to complete the configuration and close the window. The new zone appears
as a folder under the Forward Lookup Zones icon in the left pane of the window.

Steps for creating Stub Zone
1. Go to Start – Programs – Administrative tools – DNS
2. Expand the server name icon and select Forward lookup
3. Right-click on the forward lookup icon and select New Zone
4. Select Stub zone from this list as show below
5. Click Next and the Active Directory Zone Replication Scope screen is appears, which
contains replication settings of stub zone information. The default is to replicate this
information to all domain controllers.

6. Next displays the Zone Name screen, and here we type your domain name for the stub
zone.
7. Next displays the Master DNS Servers screen, and here enter the IP address of Primary
DNS server. E.g. 10.0.0.5
8. Next click finish button to complete the creation of stub zone.
Creating DNS Zone using command line
If your DNS server is running Windows Server Core, you can create forward lookup zones from
the command-line by using the DNSCMD command. Here are 4 examples:
1. Use this command to create a forward lookup standard primary zone named visioninfo.com on
a DNS server named Server1 and store the database for this zone on the server in a file named
visioninfo.com.dns. The command stores the database for this zone on the server in a file named
visioninfo.com.dns:
dnscmd Server1 /zoneadd visioninfo.com /primary /file visioninfo.com.dns
2. Use this command to create a forward lookup AD DS–integrated primary zone named
vmail.com on a DNS server named Server that is also a domain controller and store the zone
information in the domain DNS partition within AD DS:
dnscmd Server /zoneadd vmail.com /dsprimary
3. Use this command to create a forward lookup standard secondary zone named visioninfo.com
on a DNS server named Server2 that is also a domain controller, store the database for this zone
in the domain DNS partition within AD DS, and assign the zone the address 10.0.0.1 as the
master DNS server for replication purposes:
dnscmd Server2 /zoneadd visioninfo.com /secondary 10.0.0.1 /file visioninfo.com.dns

4. Use this command to create a forward lookup standard stub zone named visioninfo.com on a
DNS server named Server3, store the database for the zone on the server in a file named
visioninfo.com.dns, and assign the zone the address 10.0.0.1 as the master DNS server for
replication purposes:
dnscmd Server3 /zoneadd visioninfo.com /stub 10.0.0.1 /file visioninfo.com.dns
Steps Creating Resource Record
GUI Method
1. Right click on the zone you have created i.e. visioninfo.com
2. Select new resource record
3. Select Host A record and a new window appears
4. Type the host name e.g. pc1 and then type the IP address e.g. 10.0.0.5
5. Then click on ADD button and next Close this window
Command-Line Method
C:\> dnscmd server1 /Recordadd pc1.visioninfo.com A 10.0.0.5
Forwarder DNS
A forwarder DNS means a DNS server forwards a query for a zone to other DNS server if it does
not found a zone information in its local DNS database. Forwarder is generally when you wants
your local DNS server to forward a DNS client query to other DNS server located on Internet.
The forwarder DNS server is generally your ISP DNS server.
Example : Suppose you have a DNS server with IP 10.0.0.1 which helps to resolve your local
zone query. So all clients will need this IP as their preferred DNS server in their TCP/IP
properties. Same way all clients also want to access Internet and they have and ISP DNS server
address as 203.10.10.5. So now all clients will need to add ISP DNS address and their secondary
DNS server address in TCP/IP properties. This will be an overhead for administrator.

So instead of setting up secondary DNS address on client, we can setup our Local DNS server to
forward external zone request automatically to ISP DNS server. To do so we have to add the ISP
DNS server address in DNS forwarder properties.
Step to setup DNS Forwarder
1. Start DNS from Administrative tools
2. Right-click on the Server Name and Go to properties
3. Under properties go to forwarder tab
4. Next set the IP of ISP DNS server in forwarder.
Conditional Forwarding
Conditional forwarding was first introduced in Windows 2003. It is an enhancement to forwarder
feature. In forwarder all external request is forwarder to a specific DNS server, whereas in
Conditional forwarding you can specify that a specific request to be forwarded to a specific DNS
server.
Example : you want to forward request for vmail.com to DNS server 20.0.0.1 and vnet.com to
DNS server 30.0.0.1. In this case conditional forwarding is best suited.

Step for to configure conditional forwarding
1. Start DNS from administrative tools
2. Select Conditional Forwarder
3. Right-click on Conditional Forwarder and select new conditional forwarder
4. In the new conditional forwarder and specify the zone i.e. vmail.com and then specify the
IP address of DNS server i.e 20.0.0.1