Nesting
a Hyper-VM on VMware Workstation 8
So, following are the steps to
create a Microsoft Hyper-V VM running in VMware Workstation 8, but later I’ll show you
how to do it in ESXi 5 as well:
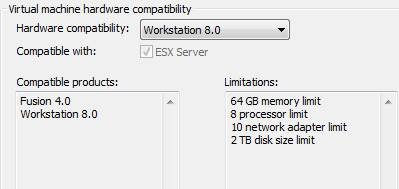
1. Create a New VM with version 8
hardware
2. Give it 4 GB RAM and 2 x vCPUs
with about 80-100 GB disk space, depending upon how many VMs you wanted nested
underneath Hyper-V.
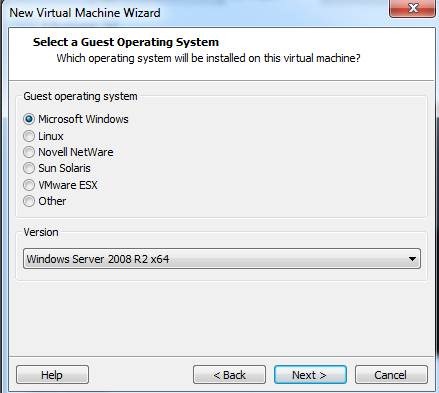
3. The instructions lead you to
believe that you should pick a VMware ESX option as the guest OS... STOP!
DON’T! Select Windows 2008 R2 x64.
4. When you are finished, make sure
you add another NIC to the VM used as the Hyper-V virtual network,
5. Under the settings of the VM >
CPU, make sure you have the option to pass-through the Intel VT-x/EPT feature.
6. Make sure you have set the VM to
boot from Windows 2008 R2 x64 media ISO.
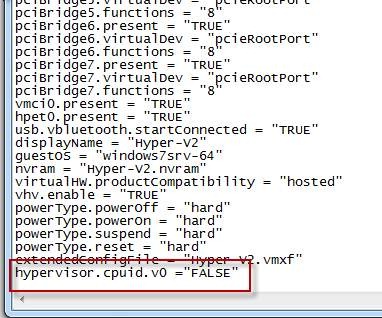
7. Before booting, you should edit
the config file .vmx and add the parameter: hypervisor.cpuid.v0 = “FALSE”
8. Now Boot and Install Windows 2008
R2 x64.
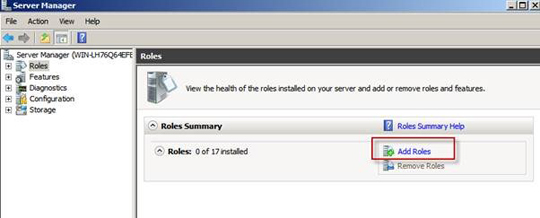
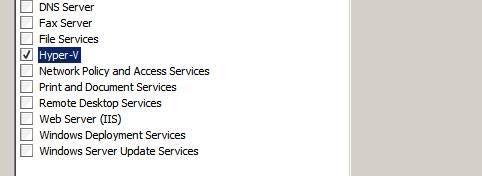
9. Once finished, open up Server
Manager and click “Add Role”.
10. Select and install the Hyper-V
option. At this point, you will know if your system is working correctly and
passing the Intel EPT feature, because if it doesn’t, you won’t be able
to go past this point.
11. You’ll also have to select the
network adapter used for the virtual network.
12. Now install Hyper-V,
which will need a reboot.
13. After it is completed, open Server
Manager drill down to Hyper-V and connect to the local server.
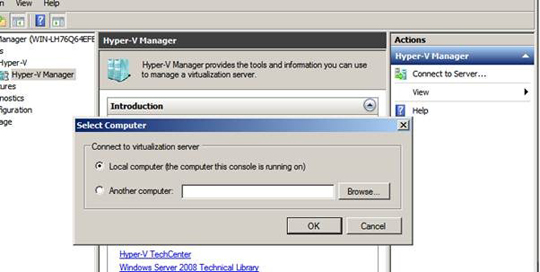
14. Now create and install a virtual
machine.
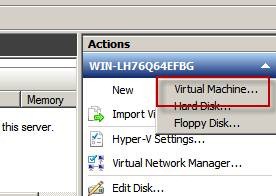
Once done, you should be able to use
it as normal, albeit slow.
Nesting
Hyper-VM running ESXi 5
Now, doing the same thing on ESXi 5
is a little trickier although some of the steps are the same.
1. Before anything you need to place
an entry in the /etc/vmware/config file found in the tech support mode on your
ESXi 5. I enabled SSH through the security profile in the vSphere Client. Then
used putty SSH into the ESXi system.
2. From there I executed the
following command which is needed to allow nested hypervisors :
#
echo 'vhv.allow = "TRUE" ' >> /etc/vmware/config
Notice the use of single and double
quotes in the command-line
3. Now create a virtual machine
using version 8 hardware, 4GB (or as much as you can spare), 2 x vCPUs, 2 or
more vNICs and a 100GB virtual disk.
4. Before booting up the VM and
installing Hyper-V we need to add two lines the virtual machines config file
.vmx
You can try this through the vSphere
Client in the settings of the virtual machine > Configuration Parameters,
whereas I had better luck doing it from command-line
To add them using command-line move
back in SSH > change into the directory where you Hyper-V VM is installed
#
echo 'vhv.allow = "TRUE" ' >> /etc/vmware/config
In my example the config file is
called Hyper-V.vmx. Type the following commands:
#
echo 'monitor.virtual_exec = "hardware" ' >> Hyper-V.vmx
#
echo 'hypervisor.cpuid.v0 = "FALSE" ' >> Hyper-V.vmx
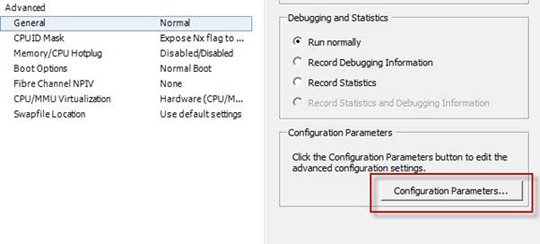
5. Now back in the VM settings > Options
> CPU/MMU Virtualization make sure you have the option to pass the
Intel EPT feature.
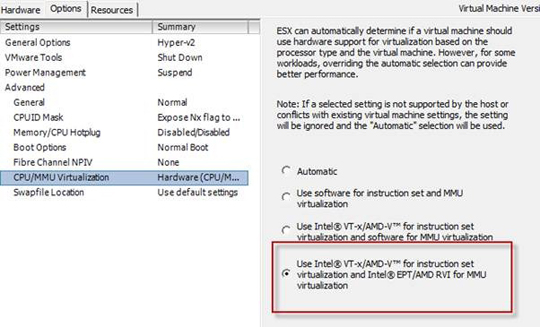
6. Now in the Options area >
CPUID Mask click on Advanced
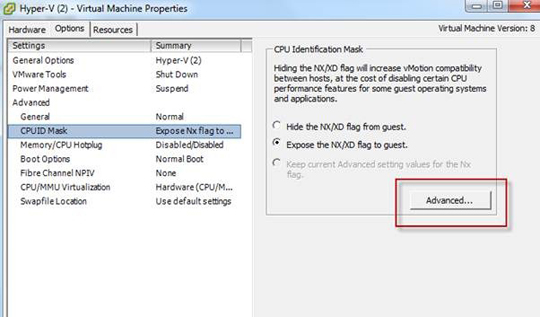
7. Add the following CPU mask Level
ECX: ---- ---- ---- ---- ---- ---- --H- ----
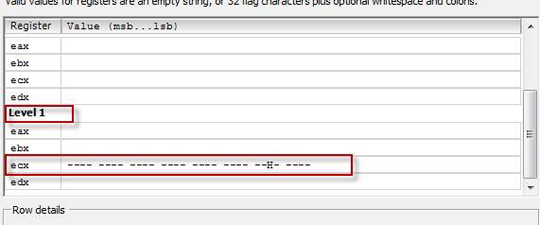
8. Now Install Hyper-V or Windows
2008 R2 and enable the Hyper-V role.
9. You are ready to roll.
No comments:
Post a Comment